Gọi upload media wordpress
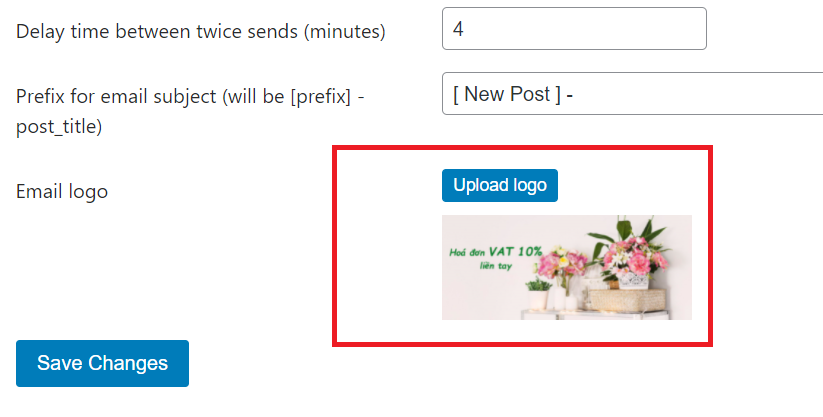
Chúng ta sẽ làm nút upload media wordpress như hình bên dưới: (lưu ý bên dưới là mã html và js thôi còn submit và lưu dữ liệu như thế nào thì chúng ta chế biến thêm nhé)
1. Mã html
|
1 2 3 4 5 6 7 8 9 10 11 12 |
<div class="form-group row"> <label for="email-logo" class="col-sm-3 col-form-label"><?php esc_html_e("Email logo","asenpts"); ?></label> <div class="col-sm-9"> <input class="form-control" name="email-logo" id="email-logo" type="hidden" value="<?php echo $email_logo; ?>" /> <button type="button" class="btn btn-primary btn-sm" id="email-logo-trigger"><?php esc_html_e("Upload logo","asenpts"); ?></button> <span id="email-logo-show"> <?php if(!empty($email_logo)): echo wp_get_attachment_image($email_logo,'full'); endif; ?> </span> </div> </div> |
2. Mã js
|
1 2 3 4 5 6 7 8 9 10 11 12 13 14 15 16 17 18 19 20 21 22 23 24 25 26 27 28 29 |
$(document).on('click','#email-logo-trigger',function(e){ e.preventDefault(); var frame; // If the media frame already exists, reopen it. if ( frame ) { frame.open(); return; } // Create a new media frame frame = wp.media({ title: 'Select a logo', button: { text: 'Use' }, multiple: false // Set to true to allow multiple files to be selected }); // When an image is selected in the media frame... frame.on( 'select', function() { // Get media attachment details from the frame state var attachment = frame.state().get('selection').first().toJSON(); // Send the attachment URL to our custom image input field. $('#email-logo-show').append( '<img src="'+attachment.url+'" alt="" style="max-width:100%;"/>' ); // Send the attachment id to our hidden input $('#email-logo').val( attachment.id ); }); // Finally, open the modal on click frame.open(); }); |
Gửi Phản Hồi
0 Bình Luận
có thể bạn cần xem:
- Disable animation trong revolution slider [ 20/09/2022 08:07 ]
- Cách tạo button printer một element bằng javascript [ 19/09/2022 12:56 ]
- Code sử dụng vue js, quasar, axios, sweetalert2 trong tác vụ quản lý danh sách [ 19/07/2022 10:26 ]
- Hướng dẫn lấy botToken và chatId của bot telegram [ 13/06/2022 13:54 ]
- Tạo thanh bar bottom mobile trong theme wordpress [ 07/06/2022 10:00 ]
- Fix acf not save iframe [ 23/04/2022 07:44 ]
- Rewrite lại url cho page template wordpress [ 21/04/2022 02:11 ]
- Tối ưu hóa cron trong wordpress để website chạy nhanh hơn [ 09/04/2022 03:30 ]
- Function tạo rating star sử dụng dashicon từ wordpress [ 03/04/2022 03:02 ]
- Thêm editor cho mô tả category wordpress (add editor description for category wordpress) [ 01/04/2022 02:02 ]
Mọi sự sao chép xin ghi rõ nguồn là fcwordpress.net
Chuyên trang về wordpress: hướng dẫn thiết kế theme, plugin, thủ thuật wordpress


